
The world of film has always been captivating to us as humans, and the introduction of the meteor has made it even more so. By drawing on the emotive impact of a meteor and pairing this with modern visual eeffect techniques, filmmakers are able to create stunning, awe-inspiring visual masterpieces that wholly capture the attention of their audiences. It is, therefore, important to understand the techniques applied to make a meteor impact on film cinematic, along with where and why this differs from reality.
The most important aspect of a cinematic meteor is that it must be realistic, because audiences need to feel as if they are witnessing a believable story unfolding on the big screen. To achieve this, filmmakers use a combination of CGI and practical effects, like fire and smoke, to create a sense of realism and draw viewers into the story. Various techniques such as camera angles, colour grading, and the use of slow-motion can also be used to make the meteor look even more impressive and captivating.
Another important technique used to make a meteor impact on film cinematic is sound design. By adding sound effects to the meteor, filmmakers can create an intense atmosphere, as sound allows viewers to feel the rush and impact of the meteor. Additionally, composers can also create scores to enhance the scene and make the meteor more shocking and powerful.
Filmmakers can also use lighting to make the meteor appear more realistic, as well as to suggest the destruction and destruction caused by the meteor. By using a combination of lighting techniques, such as backlighting and flaring, filmmakers can create an atmosphere both of awe and terror, depending on their intentions.
The cinematic use of the meteor is an incredible tool in the hands of filmmakers and is capable of creating truly captivating scenes. It is thus important to understand the varied techniques applied to make a meteor impact on film cinematic. From CGI effects and sound design, to lighting and camera angles, a filmmaker’s understanding of the tools available for creating a stunning meteor scene is what sets apart a mediocre film from an incredible one.
The speed of sound is 1217 km/h in earth atmosphere at sea level. The speed of sound is affected by the medium through which the sound energy (vibrations between particles) is projected / passing. Aspects such as the type of medium (gas, fluid, solid), along with the density of that medium have an effect. For example, sound travels more slowly at altitude due to the lower temperatures reducing the density of the atmosphere.
Mach 5 is 6,088 km/h.
I decided to leverage the work undertaken by a number of science-focused YouTube channels to assist with some of the underlying calculations and reference inputs for my scene.
These simulations were developed using sciencetific data, calculations and factual input supplied by a professor of astro-physics (Ignacio R. Ferrín, Ph. D. Full Professor, Institute of Physics, University of Antioquia, Medellín, Colombia). This was a good source of scientific data and scaling context.
The meteorite that caused the extinction of the dinosaurs and 75% of all life on Earth was believed to be 10km in diameter and was moving at 20 km a second (750 miles per minute). This means it was travelling at 45,000 mph, or 72,000 km/h.
The asteroid size I have selected for my project is significantly larger than this at 225km.
The impact of a 225km diameter meteor on Earth would be catastrophic. Such a large meteor would cause immense amounts of physical disruption to the surface of our planet, with the likelihood of billions of casualties.
Assuming a common make-up of asteroid (mainly iron / nickel metal ore, with a mixture of sulphide and carbide minerals), the injection of energy the meteor will have on impact is 1,121,728,888,907,948 megajoules. That is equivalent to 1.4 giganewtons of force, which would be released in the form of heat and strong shock waves. The sheer scale of the impact could trigger earthquakes, tsunamis, and volcanic eruptions across the globe. Every structure in the vicinity of the impact area would be destroyed, and the force of the shockwave would cause extensive damage to the planet’s surface. The concussion wave will be hypersonic, this means that that it is 5 x the speed of sound, or “Mach 5”!!!
The amount of debris produced by the meteor would fill the atmosphere, blocking out the sun and causing temperatures to drop significantly. This could cause mass crop failure, leading to food and water shortages, as well as the potential extinction of many animal species.
The spread of ash and debris would also inhibit air travel, meaning that it would be difficult to transport humanitarian aid to affected areas. This could cause further disruption and loss of life.
The effects of the meteor would also be felt in space. The shockwave of the impact would cause the Earth’s orbit to shift, potentially accelerating climate change and leading to extreme weather conditions.
The long-term consequences of the impact would be severe and cause permanent damage to the planet. Even if the world survived the initial shock, the impact of the meteor would have lasting impacts. The environmental damage could take centuries to repair, and the effects on global climate could be felt for generations.
It is impossible to predict the full consequences of such a catastrophic event, but the impact of a 225km diameter meteor would be devastating and likely result in the eradication of all complex life from the Earth!
There are no real world visual references for meteor impacts of the scale represented in my project. However, there are many references I have drawn from in popular cinema.
Deep Impact (8/10) Movie CLIP – The Comet Hits Earth (1998) HD


Greenland Final Comet Planet Killer Scene | HD clip

65 (2023) Asteroid hitting the earth scene HD

Don’t Look Up – Comet Hits the Earth


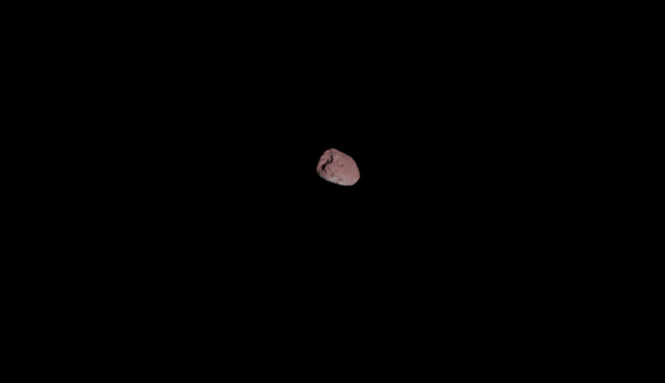
I have selected an asteroid known as 624 Hektor as the rocky body that will impact with the Earth in my project. It is in Jupiter’s orbit around the sun at present, orbiting the sun every 4,420 days. 624 Hektor is 225km in diameter, bigger than 99% of other recorded meteors to impact the earth. It is the same size as Maryland in the USA, with a mass of 14 million tonnes!
This asteroid currently rotates on its axis very slowly, with only 0.0144 rotations per second, meaning in reality it would not complete a single rotation during the entire scene, or even visibly rotate at all! For the purposes of cinematic engagement with the audience and conveying the enormity of the asteroid and speed on the approach to earth, I will animate the asteroid object to rotate 90 degrees on it’s transverse axis (nose over tail in the direction of travel) during approach.
The distance the meteor will start from the surface of the Earth is approximately 1600 km in the scene
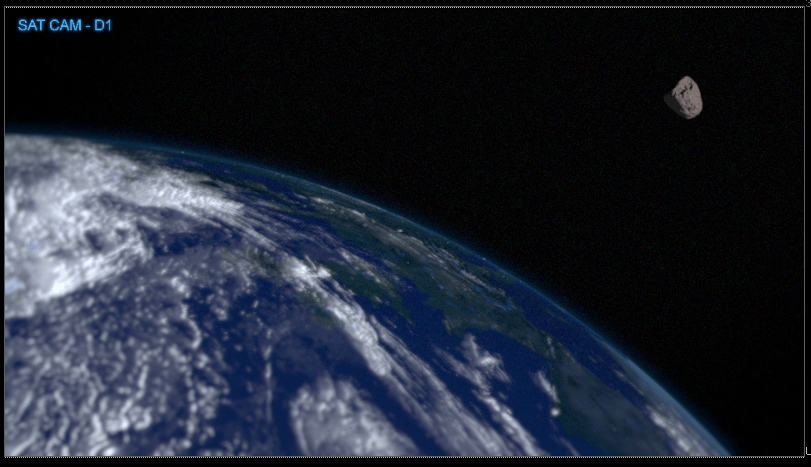
To convey the scale of the impact, I have opted to use the vantage point of a satellite-based camera overlooking the Earth, at an approximate altitude of 2000km. I originally intended to use the International Space Station (ISS) as the viewpoint, but determined that, at only 408km altitude, this would not provide the angle and distance from the Earth that I was aiming for.
The ideal angle of impact for maximum devastation is 60 degrees to the surface. However, most cinematic references choose to hit at 90 degrees from the surface of the planet. I have elected to adopt the same approach vector for my project and use an angle of impact somewhere in between, as I liked the way this appeared on screen.
The scene will be no longer than 35 seconds. It is two shorts with two cutaways.
For my final shots I will use a 50mm lens for the astronaut POV and a 50mm lens for the Satellite Camera as this has a much wider aperture than a zoom lens, so captures more light, for better exposure.
In short, the answer to this is no!
Stars shining in the deep darkness of outer space have been captured on camera many times by astronauts. But there are several factors contributing to why stars are usually not visible in videos filmed in space.
Firstly, cameras that are sent into space are not optimized to capture a wider spectrum of light, meaning they can only register a restricted range. When we look at stars through our eyes, our pupils can adjust, allowing us to adjust to minimal light and see a much wider range. Cameras cannot do this, and thus miss out on much of the light being emitted from stars.
Additionally, the lack of atmosphere in space means that light does not scatter the same way it does on Earth. This causes stars to appear much dimmer than they would be to an observer on Earth. On Earth, stars can be seen because light from the stars is scattered by dust and gas in the atmosphere. This is not the case when filming from space.
Finally, stars are very far away, and cameras are only able to capture a very small area of space in each shot. If the stars were not included in the shot, they would be so small and dim that they would not be visible.
For these reasons, I have elected not to show any form of starfield, as this is more accurate and aligns to the majority of cinematic and real-world reference of vidoe film shot in space.
The way distance and scale affect the perceived speed of events in a film can have a major effect on how a story is told and experienced. Visual Effects Artists must be aware of this aspect of visual storytelling in order to create the desired effect for their audience.
Distance and scale can play a big role in how a story unfolds. When events appear closer to the camera, they will appear to happen faster than events that are further away. This is because the viewer’s perception of time is affected by the perceived distance; the farther away an event happens, the slower it will appear.
In addition to the distance between the camera and the events being filmed, the scale of a scene can affect the perceived speed of events on film. Scenes that have a larger scale of action, with more characters and movement, give the audience a sense of rapidity in the events. Conversely, scenes with a smaller scale of action will feel more deliberate and slow, as if time is standing still. A VFX artist must translate these real world considerations into the 2D or 3D space within which they are generating the effects.
When using scale and distance to affect the speed of events on film, VFX artists must also consider the frame rate in which their scenes are rendered. The frame rate is the number of frames or individual images that make up a second of film. A lower frame rate will make the events on film appear to move slower. A higher frame rate creates the illusion of faster movement as each frame presents more information per second. It is important for the VFX artist to understand the overall objective of the filmmaker / director to ensure the rendered output meets these goals.
Cinematographers must also consider the medium in which the film is being projected. While a film may look fast or slow on one medium, it may look different on another. For example, a film projected in a standard movie theatre may appear slower than the same film projected in a IMAX theatre due to the difference in the size of the screen. Any impact of the target viewing medium must be understood by the VFX artists to ensure correct pacing and scale for each medium.
The way that camera movement is utilized can also affect the perceived speed of events on film. A tracking shot – which follows the action – can create the illusion of rapidity as the camera keeps up with the movement, while a panning shot – which moves the camera along a stationary object – creates a more gradual effect.
Cameras and lenses can also be used to adjust the speed at which events appear on film. A wide-angle lens, which captures a wider range of the scene, can make the action feel faster, while a long lens, which captures a more limited area, will slow it down. The camera speed can also be adjusted to slow or speed up the action, depending on the effect the filmmaker is trying to achieve. The VFX artist must comprehend these factors to ensure the rendered output matches with any real world camera footage, as sudden changes in lens can be jarring for the audience, bringing them “out of the scene”.
Finally, filmmakers should consider the use of sound when creating an effective visual story. The sound can add to the viewer’s perception of the speed at which events are occurring. For example, a fast and driving soundtrack will create a more intense and rapid feeling while a slower, more solemn score will create a more drawn-out and slower feeling. Whilst the VFX artist will likely not participate in sound production, it is critical that any timing queues or pacing for already captured sound elements are factored into the timing of the rendered output.
In summary, distance and scale play a major role in how the perceived speed of events is experienced in a film. VFX artists must pay close attention to the frame rate, the medium in which their films are projected, the camera movement and lenses used. With the proper understanding and utilization of these techniques, VFX artists can create scenes and effects that elicit the desired emotional responses from their audiences.
Given the immense scale of the scenes included in my project and distances involved, it is critical that the pacing is such that the human viewer will accept and indeed feel the colossal scale and distances involved in the scenes, whilst not being too slow. If too slow, the audience attention will drift and the intensity of the events unfurling on screen is lost.
2 shot comparison of a CGI cinematic meteor strike and a composited realistic meteor strike.
Find plates online to use for the background or go to the top of Ditchling beacon or Devils Dyke and shoot footage myself.
I decided to tone down the idea 1a, to ensure focus on a quality end product, rather than shot quantity.
One shot focus and incorporate both cinematic and realism into the shot, but still show the differences.
A shot from outer space using CG, not shot footage!
¼ Earth in frame and a meteor strikes. The clouds part ways. Cloud and destruction simulation.
Still one prime shot.
Perspective from the moon surface rather than a satellite perspective.
Have audio over the top to add cinematic effect, intercoms of NASA astronauts and sound of the meteor impact.
Still keep cloud and destruction simulation, but in addition I will have another dust effect of the moons surface being hit by the shock wave. Camera shake to be added to the shot as well as camera dirt.
An extension of 2a to incorporate both the narrative elements of 2a, with the Houdini simulated CG shot of the impact from the perspective of a satellite orbiting the Earth more closely than the moon.
I have elected to proceed with Idea 2b, as I believe this combines a good sense of narrative, whilst also articulating both my technical skills as a VFX Artist, especially my focus on Houdini simulations (including destruction, explosion, pyro and particle sims).

Shot from the shoulder camera view of an astronaut on the moons surface looking at Earth in the distance.

Wide locked off shot of the meteor coming into frame and travelling towards earth.

Meteorite impacts the surface of the planet.

Meteor causes a huge blast and shock wave that travels around the planet pushing the clouds around them out of the way, while causing mass destruction.

The blast wave engulfs the planet and debris from the impact crater is thrown up into space along with some of the blast wave.

Return to the original camera shot. The explosion grows in size and a blast and shock wave can be seen travelling around Earth. This is shown through the clouds being blown around the planet and the explosion growing in size.
I needed some recorded dialogue to provide both context and impact to the scenes, by very quickly establishing the narrative for the overall scene.
[Normal voice, slightly bored] No, I don’t see anything. Are you sure…
[Shocked tone] Wait, did you… what was that?!?!
[Hurried tone] Patching into SatCam Delta one…
[Faster, Deep breathing] Oh My God, look at the size of that thing!
Messaging all stations, incoming meteor approaching at a velocity of 375,000 kph. Impact point is western Europe… NOW!
[Sharp intake of breath] Woah, we lost signal…
Patching back in now… How the hell did we miss this?!?
I then had a friend from the USA (Rochester, upstate NY) record the lines of scripted dialogue.
As discussed previously, the perceived speed of events on film can be dramatically affected by distance and scale. The artistry of creating realistic, yet cinematic visual effects is in taking certain liberties, or making compromises in the timing and speed of events to maintain pacing of the scene, whilst maintaining the sense of scale and gravity that grounds the scene in the mind of the audience.
I will use cutaways in the overall scene and different points of view to both deliver the narrative, whilst also providing timing breakpoints. The events of the explosion will happen slightly faster than they would in reality (approximately 1.25x -2x real world speed), which keeps the scene length under control and retains the audience attention.
For example, the meteor is travelling at a, “velocity of 375,000 km per hour”, as per the dialogue. Based on the scale of the image from the satellite, the satellite is in Low Earth Orbit, at an approximate altitude of 2000km from the surface of the Earth. This provides a view of a section of the Earth’s surfacthat has an outer circumferential distance of 5000 km. It would take this satellite approximately 2 hours to complete a full orbit, so very little change of the portion of the Earth’s surface in view would occur through the length of the scene. Therefore, I chose to maintain a static perspective from the satellite camera.

I want the shot of the asteroid moving through space to be no longer than 8 seconds from the start of the shot from the satellite camera to impact with the Earth.
The reality is that a concussion wave for the energy on impact would take 30 – 40 minutes to cover every inch of the Earth. For something that is appropriate for a cinematic experience, the velocity of the meteorite will be 375,000 km/h or 104 km/s. This is 5 times the speed of the meteor that killed the dinosaurs, but not unrealistic in the context of an asteroid of this scale!! In terms of narrative, the velocity of 375,000 km/h is acceptable, but I will need to accelerate this on screen to avoid pacing issues in the overall scene.
The meteor travels approximately 1600km across the screen. This is 10 times the diameter of the meteor, which is 200km. At a velocity of 375,000 kph, this translates to 104.17 km per second, which would require 15.4 seconds for the meteor to traverse the space between the edge of the shot and impact point at real world equivalent (scaled) speed. I felt this was too long and the audience would disengage. Therefore, to maintain pacing, I doubled the speed at which the meteor traverses the space, to make this shot only 8 seconds long. This looks realistic, without losing any sense of scale. The velocity of 375,000 kph is maintained within the narrative, however.
The crater from an impact of this scale would be approximately 2000 km – 2500 km wide. I had to extrapolate this from the various source materials, as none of them referenced a 200km meteor impact specifically.
The explosive energy released scales by a compounding multiplying factor of approximately 1.25 per additional 100km of diameter. Explosive force is often described in the form of “Tzar Bombs”, where 1 Tzr Bomb = the explosive force created by detonating 5 Million Tonnes of TNT. That’s a cube of TNT 300 M in length on each side, or the equivalent height of the Eiffel Tower!
Therefore, by this scale the explosive force released would be in the region of 1,362.5 Million Tzar Bombs, or 6,812,500,000,000,000 Tonnes of TNT! The force of gravity would pull the ejection mass downwards, so would both constrain the speed and height of the ejection, whilst also pulling objects with any meaningful mass (such as rock and magma) back towards the surface. By applying a gravity force within the simulations, I was able to model the effect on the generated and emitted particles and smoke elements.
I generated the following effects elements within Houdini :
I also captured audio recording for spoken dialogue to add to the final edited scene.
Asteroid Geo – https://www.productioncrate.com/objects/rendercrate-lava-rock-3
Earth Texture – https://www.turbosquid.com/3d-models/photorealistic-earth—21k-3d-model-1188790
Moon Image Plate – https://wallpapercave.com/w/wp10919413

Camera HUD element – https://vfx.productioncrate.com/video-effects/footagecrate-deluxhud


Camera transition effects (flare) – https://vfx.productioncrate.com/video-effects/footagecrate-lens-flare-warm-transition-5

Camera transition effects (glitch) – https://vfx.productioncrate.com/video-effects/FootageCrate-Glitch_Transition_Blue_Code

Camera transition effects (glitch) – https://footagecrate.com/video-effects/footagecrate-glitched-4k-transition-staticdistortion

Debris flying towards satellite camera – https://vfx.productioncrate.com/video-effects/footagecrate-meteor-fly-by-camera-1

Lens Flare (Warm) – https://footagecrate.com/video-effects/footagecrate-lens-flare-warm-transition-5

I also obtained a variety of audio effects from FootageCrate (for which I have a subscription) to add depth and realism to the recorded dialogue :-
I will generate simulated elements using SideFX Houdini. The impact destruction will comprise of multiple separate simulations (impact crater, flame / magma eruption, pyro smoke, smoke flares, steam and mist from falling hot debris) composited together within Houdini to output a single rendered sequence of images.

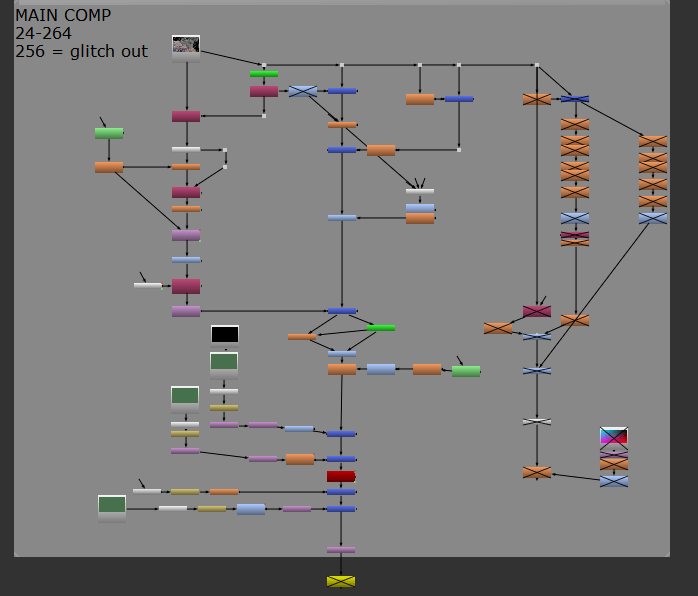
This is an overview of all the node trees that collate together to create the meteor impact hit. Each one of these nodes contains a group of nodes within them which I have manipulated to create the explosion, smoke and trail effects.

The 5 nodes on the left are the render outputs for the 5 passes of what makes up the explosion. The central top one (Simulation) is where I did the creation of all the effects that are then outputted to the 5 render nodes on the left-hand side.
There are two geo nodes that both share the same geometry, which is the earth, but serve two different purposes, which I’ll go deeper into in the following sections. The yellow node is the sun light which is a simple handle you toggle or put values into to gain a result.

The two blue nodes are my cameras that I used for both shots of my final piece, the Satellite shot and Moon rover cam.
At the top of this node tree, I am importing my earth geometry that Is included in the final output after it has been modified in the tree. Extrude volume 2 down to OUT_EARTH_VDB is where I created the collision geometry that allows the geometry of the Earth to be interacted with. This means that all I have to do now is point a collider to pull data from this node and whatever is being created alongside the collider will now collide with this geo. From transform 6 down to GEO_FINAL_OUT, I created the layer of UV’s that allow the geometry to be textured and have the stitching look correct along the geometry so that there aren’t any weird looking artefacts. The multiple material passes are the different levels to the texturing such as the base planet texture, clouds, bumps and normal. GEO_FINAL_OUT is a layer that is being displayed in the final output of the shot.

This node tree is very similar to GEO1. This is only displaying the atmospheric glow through using a colour channel to generate it. It isn’t very visible, but it gives the Earth a colour tint that helps match the look from real life reference.

The matnet node is where materials are altered and applied to different types of shaders that are then used in a network to be used on material nodes.

This is the Camera perspective from Moon_cam. This was created to have a shot from the moon to add a level of depth to the narrative of the scene. It was shot so that the sun is over to the left so in a later section of this project I would pan the camera to the left and have a glint of light.

I used a 50mm lens for both shots as this held a good balance between what they really use which is a 70mm lens on the ISS and a common film camera lens is 35mm. By using 50mm it best represents what the human eye would see if it was at the location of the camera’s perspective.


Above is the whole node tree for how I created the simulated explosion. It consists of multiple sub node trees that all start from the same point and branch off to output different elements that’s will in conclusion be layered up together to create the full explosion. The left-hand side of the tree was built as the smoke/dust simulation and the right-hand side is the explosive element and debris trail.

The Geo is where I import the base geo of the earth so I can have a good physical reference to source the geometry from rather than just a random sphere or cube of geometry as the proportions would be off. I tailored my workspace to have proportions correct for the scale of different objects so that the size and maths could be calculated correctly when plugging in values into parameters.
Attribdelete was created to remove any unnecessary data on the geo that could slow down processing as this geo is a reference to pull points and location data from.
This is the Volcanic smoke element that I created. I gave it this name due to the fact that volcanos project a lot of ash and smoke upwards and it was a much better node path name than, “Meteor impact area, explosive smoke/ dust lift up”. Houdini is looking for short names so it is much more accessible and easier to locate.
The main creation of the smoke was inside of the popnet where the particles could be manipulated to whatever I configured them to do.

I used a lot of attribute nodes in creating this element so I could have control over the values with the use of expressions using VEX. The Wrangles are where the expressions were written and the noise nodes are where an interesting look was added to create a more interesting smoke element.
The dopnet is where it really took form and had a look of actual smoke. In using a pyro post process, I could now output the look I wanted and have it cached so I could play it back with no issues and not a lot of waiting around.


Here I created the base layer of smoke/ dust that begins to fill out and stays lower to the planets surface as this hasn’t been projected into space as much as the other sim.

This adds a layer that shows how big the destruction truly is. As I have now discovered the more layers that you can have the better. That only applies if they are meaningful though. By having this layer, it shows a new level of interest in the shot and shows that a lot of destruction has occurred as everyone under that blanket of smoke/ dust is dead as they were in close proximity to a huge meteor impact, so they are some of the first killed by it.
I use attribute wrangles again to achieve full control of the manipulation of the points and a dopnet to create the force effects such as swirl and turbulence.
The pyro and cache nodes do the same as the Volcano smoke node tree.

This was an extremely fun part where I created what is essentially debris of the planet being thrown up into space. This was challenging as I had to basically select point from the geometry and delete everything but them. After this I then animated the points using a time shift node which created a randomisation effect. Using a pointvop node allowed me to control the points I was using. The popnet was where the effect was developed and the look side was visible as this is where I could include things such as dissipation and drag.

I kept the habit up again of caching as much out as I could that was necessary as this sped things up in the later stages. When caching this took a long time though as I accumulated a couple hundred gigabytes of caches that I used. This doesn’t include unused ones which there were lots of.


I built this section of the node tree to create the explosion effect that was a crucial layer to be made.

I used spheres as the geometry for the points to be attached to and ratioed them 1 point to 1 sphere. I used a randomisation expression in the wrangle nodes to distribute the points at random seeds for the spawn and randomised the points again to determine the sizes of them and had them use a range the went between a value of 0.3 and 1. Copy to points was where the spheres were attached to the points.

This was a small but great addition where I broke off from the particle tree and created a pass where the particles now had an emission layer that created a glowing effect around them. This was a great addition as the particles now had a depth and different colour to them as they had essentially been copied over themselves with the geo switched off and the light being displayed.

Now with the variance of colour this represented the temperature change due to time of ejection from the earths molten core. The higher up or further away the points were from the origin the darker they went to represent a cooling effect. The magma wouldn’t cool rapidly, but in going into space it would cool down a bit.


These are all of the Outputs I used from importing the end of each node tree in the simulation. This made it easy to render the passes individually or turn them all on a view them together, which helped greatly in creating my breakdown video. It also allowed me to make any last changes in the render nodes trees of elements so I could fix any problems or make an addition to the element.
I used the different pass outputs to generate the separate pass renders for an effect breakdown video. I believe this provides a good visual reference for how the different simulations and elements come together to achieve an impactful and pleasing visual effect.
This is the Nuke script I created and used to generate my final output. I organised it into one Nuke script to make it more accessible to myself and in terms of a workflow it could be passed onto another in the industry and they can easily see what is where as I have indicted this visibly for them. I thought it was extremely important to follow industry standards with things like layout and accessibility so I made this a priority for all of the scripts I created on this project.

This is where I created the final output for the first shot that is shot from the moon. It’s from the perspective of a rover. I have displayed the frame range I used for the render of the sequence to help myself set the write nodes correctly and adjust my project settings accordingly. I layered up a lot of elements in this shot such as my moon picture which I created the effect of it being a 3D floor geometry. By using lens distortion and a crypto matte the 3D perspective effect was created. Layering up the other effects with a multiply and retime node really helped the scene come to life by adding things such as a heads-up display (HUD), and lens flare when the camera turns to look at the direction of the sun.

Early Shot Sat is where I did the satellite composition. This was creating the earth halo effect on the horizon of the planet to give it the atmosphere. I did this through a lot of blur nodes and glow nodes.

The meteor that I animated and lit in was comped in on this shot. I used feather effect on it to take some sharpness away from the edges as it passes in front of the atmosphere as the glow would reduce the sharpness on such a fast-moving object. The explosion and over exposure effect were both comped in at the bottom as they both didn’t require much treatment apart from a small retime and blur mask.
This part of my nuke script is very similar to the first satellite shot. I removed the atmospheric glow in this shot as it has been shattered by the planets being hit by a massive meteorite travelling extremely fast.
The two elements I added are both there for dramatic effect. The camera disruption adds a level of unease and the flying debris is an effect that matches the debris I created in the Houdini project.
I also added a cloud movement through the use of transform nodes to add the effect that a concussion wave has blown the clouds in a direction away from the blast. The concussion wave had occurred during the over exposure of the camera so we are viewing the aftermath of it.
The three finished shots are as follows :-


I edited the composited scene renders output from Nuke along with audio elements together with some added transitions and effects elements to create the final piece of work within Adobe Premiere Pro.

I am very pleased with the final outcome from all of this work.
In framing this Final Major Project, I posed the question, “What techniques are applied to make meteor impacts in film cinematic?”. Through a combination of reference inputs, research and personal skills development, I have determined that there are several factors applied by visual effects artists that often stretch reality, or take certain creative liberties in creating a cinematic effect for this type of huge impact event.
Pacing is a fundamental consideration to make. Events must take place at a speed that maintains the pacing the audience expects, but also will retain their attention, whilst simultaneously driving a narrative and looking realistic. For example, I chose to move the meteor at almost double speed across the space between the edge of shot and point of impact. This still looked realistic, but enabled me to maintain pacing that fit within the narrative of the scene.
I also had to consider pacing for the explosion effects. This runs at approximately 1.25 times real world scaled speed, in order to generate an effect that looks and feels as the audience expects, without dragging out too long. Having different sized elements move at different speeds on screen and the final few frames including large ejected rocks flying close to camera ties all of the pacing together in a pleasing way that also fits well within the narrative.
Scale and distance affect the pacing, as moving too quickly has an immediate impact on our sense of scale and distances involved. Again, a careful balance of pacing is needed to maintain an accurate context of scale and distance, driving the pacing of the scene and narrative. This is critical to achieving an overall cinematic effect.
The relevant elements of the mise en scene, such as camera positioning, movement and angles (composition), lighting and components of the scene (props) are all important. My camera positioning was defined by the narrative and remained closer to a real-world scenario. In many of my film references, there are shots of cameras from a perspective trailing, or even flying through and past the meteor debris field, as it transits towards impact. This type of camera positioning and movement is another tool to convey scale and speed, but can create disjointed pacing within a scene if not carefully applied. I decided to remain true to my narrative and use a static camera for my main explosion effect shot, positioned on a satellite orbiting the Earth.
Lighting and camera exposure in space means you expose for the brightest elements of the scene, being the Earth reflecting the sunlight and the explosion effect. I maintained consistency in lighting for continuity between shots, but this meant no stars could be seen. Again, this may not meet the expectations of the audience for a space-based scene, but is true to reality and better aligns to my overall narrative.
Beyond the Houdini simulated visual effects themselves, I learned how other aspects of the VFX workflow, such as Nuke compositing, bring in effects and elements that add further depth and substance to achieving a cinematic effect within a scene. Most of these would exist in a real-world event, so it is critical to incorporate them to achieve a strong degree of realism, but it is the blending of these skills within the VFX pipeline together that delivers this in a cinematic context.
Finally, adding sound, both dialogue and audio effects, significantly contributes to the cinematic effect for an event such as this. In reality, there would be no sound detected by an observer of the impact from the perspective of either a camera in space, or the moon, as sound doesn’t travel in a vacuum. In order to drive narrative, tie the effects into this narrative, maintain pacing and emphasise the enormity of the events unfolding on screen, all the time maintaining the audience’s attention and interest, film-makers bring together visual effects within music, sound effects and dialogue to achieve the final end product you experience in the cinema.
Comments are closed